
How to get an e-Visa to India online: Step-by-step guide
 By Irena Domingo
Updated on
In This Article
In this post I’ll explain step by step how to obtain an electronic visa to travel to India (known as e-visa or ETA). It is easy, fast and economical.

Note: the procedures for obtaining the e-Visa to India can vary from one day to another, so I will try to keep this article updated with the latest news. In any case, I recommend that you contrast the information in this article with the official site information.
1. TEN BASIC QUESTIONS ABOUT ELECTRONIC VISA (and its answers)
In previous articles, I have explained how to obtain the electronic visa to Russia or the online visa to China. Recently I have requested an electronic visa (e-Visa or ETA) for a friend who is traveling to India, so at the same time that I have requested the eVisa, I have decided to write this article to explain step by step, with screenshots, how I did it.
Before explaining step by step the process of obtaining the Electronic Travel Authorization (ETA) to visit India, it is convenient to answer 10 basic questions about the electronic visa, so that you can easily understand the application procedure without having to read all the instructions from the official website of the Government of India.
Let’s go there :)
1.1. Who needs a visa to travel to India?
The first question to answer is who needs a visa to travel to India and who doesn’t:
- Countries that DON’T NEED A VISA to enter India. Citizens of countries that maintain good relations with India, such as Bhutan or Nepal, can freely enter India without a time limit. Also, citizens of the Maldives can enter India without a visa for a period of up to 90 days, though under certain conditions.
- Countries that DO NEED A VISA to enter India. The rest of the countries in the world need a visa to travel to India, which can be of three types:
- Visa on arrival. It refers to the possibility of obtaining a visa upon arrival in India, meaning that you don’t need to process a visa in advance in your country. You can show up with your passport at customs and get the visa instantly by filling out a form and paying the corresponding fee. Currently, only citizens of countries with good relations with India such as Japan and South Korea can obtain a visa upon arrival in India.
- E-Visa or electronic visa (also called ETA). Most countries in the world (currently 169) can apply for an electronic visa to travel to India, through the official website of the Indian Government: https://indianvisaonline.gov.in/evisa/tvoa.html (Beware with fraudulent websites that mimic the official website!). The advantage is that you don’t have to travel to any consulate or visa center to complete the process. Of course, it must be requested in advance before traveling to India. Below I explain you step by step how to get it.
- Regular or paper visa. Citizens of other countries, which I would call as countries with worse diplomatic relations with India or also African countries, need to process a traditional visa in advance for which they must submit more documents and travel to the Indian consulate of their country or the Indian visa application center. These countries are basically Pakistan, Afghanistan, Bangladesh, as well as many of the countries in North Africa.
On this Wikipedia map, you can clearly see what I just explained. The orange countries are those that can apply for an electronic visa to India:

1.2. What is the e-visa to India?
The e-visa (or electronic visa or ETA) is an official document issued electronically by the Immigration Office of the Ministry of Interior of the Government of India, and which allows entry into the country.
It is also called Electronic Travel Authorization (ETA). E-Visa and ETA have the same meaning. It is the alternative to paper visa.
This is a visa that must be requested and obtained before traveling to India, that is, it is not a visa that is requested upon arrival at an airport in India.
The e-visa has three great advantages over the paper visa:
- You can obtain it electronically and easily from your home through the website enabled by the Immigration Office of the Ministry of Interior of the Government of India: https://indianvisaonline.gov.in/evisa/tvoa.html. Therefore, it is not necessary to travel to any Consulate or Indian visa center to complete the process.
- The required documentation is very little. For example, for the tourist visa it is sufficient to provide a digital photo and the first page of the scanned passport (the one in which the photo and personal data comes). It is not necessary to provide invitation, or hotel reservations, or airline tickets or other documents that justify the purpose of your trip. Of course, once the electronic visa is obtained, to enter India it is highly recommended to have travel medical insurance.
- It is much more economic than a traditional visa, even free for citizens of some countries. Below I explain.
As disadvantages, I would say that the e-Visa is not extendable, but this can be arranged by requesting an electronic visa for a period longer than expected. The e-Tourist Visa can be 30 days, 1 year or 5 years.
1.3. What e-visa categories exist?
The Indian e-Visa can be of any of the following categories:
- e-Tourist Visa. When the reason for the visit is tourism. This is the type of visa requested by the vast majority. It can be requested for a period of 30 days, 365 days or even 5 years.
- The 30-day e-Tourist Visa is double entry, meaning that you can enter India twice during the period of validity of your visa (you may want to visit a bordering country and then re-enter India)
- The 365-day, 5-year e-Tourist visa allows multiple entries.
- e-Business Visa (multiple entries). When the purpose of travel is commercial or business. The duration is 365 days. It allows multiple entries.
- e-Medical Visa and e-Medical Attendant (triple entry). When the trip has to do with some medical treatment. The duration is 60 days and it’s a triple entry visa.
- e-Conference Visa (one entry). When the purpose of the trip is to attend a conference. The duration is 30 days and it is a single-entry visa.
1.4. What is the period of validity of the electronic tourism visa?
The tourist visa can be 30 days, 365 days or 5 years, but when does the period of validity of the visa start counting? Well, it depends on the duration of it.
- 30-day tourist visa. The visa validity period is 30 days and starts counting from the day of the first arrival in India, at which time they will seal your passport with the date of entry.
- Example: if you have been issued a 30-day tourist visa with an issue date of September 30 and expiration date of October 29, this means that you can enter India during this period. If you enter India in October 15, then the period of validity of your visa will be from October 15 to November 14. If you enter on October 25, then the period of validity will be from October 25 to November 24. The visa allows two entries.

- 365-day or 5-year tourist visa. In this case, the period of validity of the electronic visa is 365 days and it starts counting from the date of issuance of the visa and not from the date of entry into India.
- If on March 16, 2019 you request a 1-year electronic tourist visa and they grant it to you within 2 days, with an issuance date of March 18, then the validity date of the visa will be from March 18, 2019 until March 17, 2020. You can enter India as many times as you want during this 365-day period and the maximum stay allowed each time you enter India will be 180 days.

1.5. Who can apply for an electronic visa to India?
As I explained above, the electronic visa to India may be requested by citizens of 169 countries, though the list may vary over time. Currently these are the countries that can apply for the electronic visa:
- Albania
- Andorra
- Angola
- Anguilla
- Antigua & Barbuda
- Argentina
- Armenia
- Aruba
- Australia
- Austria
- Azerbaijan
- Bahamas
- Barbados
- Belarus
- Belgium
- Belize
- Benin
- Bolivia
- Bosnia & Herzegovina
- Botswana
- Brazil
- Brunei
- Bulgaria
- Burundi
- Cambodia
- Cameroon Republic
- Canada
- Cape Verde
- Cayman Island
- Chile
- China
- China- Macau
- China- SAR Hongkong
- Colombia
- Comoros
- Cook Islands
- Costa Rica
- Cote D’Ivoire
- Croatia
- Cuba
- Cyprus
- Czech Republic
- Denmark
- Djibouti
- Dominica
- Dominican Republic
- East Timor
- Ecuador
- El Salvador
- Eritrea
- Estonia
- Fiji
- Finland
- France
- Gabon
- Gambia
- Georgia
- Germany
- Ghana
- Greece
- Grenada
- Guatemala
- Guinea
- Guyana
- Haiti
- Honduras
- Hungary
- Iceland
- Indonesia
- Iran
- Ireland
- Israel
- Italy
- Jamaica
- Japan
- Jordan
- Kazakhstan
- Kenya
- Kiribati
- Kyrgyzstan
- Laos
- Latvia
- Lesotho
- Liberia
- Liechtenstein
- Lithuania
- Luxembourg
- Macedonia
- Madagascar
- Malawi
- Malaysia
- Mali
- Malta
- Marshall Islands
- Mauritius
- Mexico
- Micronesia
- Moldova
- Monaco
- Mongolia
- Montenegro
- Montserrat
- Mozambique
- Myanmar
- Namibia
- Nauru
- Netherlands
- New Zealand
- Nicaragua
- Niger Republic
- Niue Island
- Norway
- Oman
- Palau
- Palestine
- Panama
- Papua New Guinea
- Paraguay
- Peru
- Philippines
- Poland
- Portugal
- Qatar
- Republic of Korea
- Romania
- Russia
- Rwanda
- Saint Christopher And Nevis
- St. Lucia
- St. Vincent and the Grenadines
- Samoa
- San Marino
- Saudi Arabia
- Senegal
- Serbia
- Seychelles
- Sierra Leone
- Singapore
- Slovakia
- Slovenia
- Solomon Islands
- South Africa
- Spain
- Sri Lanka
- Surinam
- Swaziland
- Sweden
- Switzerland
- Taiwan
- Tajikistan
- Tanzania
- Thailand
- Tonga
- Trinidad and Tobago
- Turks and Caicos Islands
- Tuvalu
- Uganda
- Ukraine
- United Arab Emirates
- United Kingdom
- United States Of America
- Uruguay
- Uzbekistan
- Vanuatu
- Vatican City – Holy See
- Venezuela
- Vietnam
- Zambia
- Zimbabwe
1.6. How much does Indian evisa cost?
The price of the tourism e-Visa to India depends on 3 factors:
- The period of duration of the trip. The greater the duration, the greater the cost. For example, a 30-day electronic tourist visa to travel to India in August usually costs about $25. If the duration is 1 year, the price rises to $40 dollars, while if it’s 5 years, the price is $80.
- The period during which you travel. It is more economic to travel from April to June, during which the visa costs only $10. On the other hand, if you travel from July to March, the price is $25.
- Nationality. For citizens of some countries the electronic visa is free. For example, for Argentines or Uruguayans, the visa is free. It is also free for citizens of Indonesia, Jamaica, South Africa, etc.
In this link you will find all the countries that can request the Indian electronic visa and the prices of the electronic tourist visa (e-Tourist Visa). The other types of visa have a price that ranges between $80 and $100. In this link, you have the list and prices of other types of visas (business, medical care, etc.).
1.7. Can I enter India with an electronic visa through any airport, port or border point?
No. It is important to know that with the electronic visa it is only possible to enter India through the authorized immigration control points. Of course, among these points is the main airports and ports of the country, through which the vast majority of people traveling to India enter.
The departure can be made by any border where there is an immigration office.
AUTHORIZED ENTRY POINTS
Airports
- Delhi
- Mumbai
- Chennai
- Kolkata
- Thiruvananthapuram
- Bengaluru
- Hyderabad
- Cochin
- Goa
- Ahmedabad
- Amritsar
- Gaya
- Jaipur
- Lucknow
- Trichy
- Varanasi
- Calicut
- Mangalore
- Pune
- Nagpur
- Coimbatore
- Bagdogra
- Guwahati
- Chandigarh
- Visakhapatnam
- Madurai
- Bhubaneswar
- Port Blair
Ports (for tourists arriving by cruise)
- Mumbai
- Cochin
- Mormugao
- Chennai
- New Mangalore
AUTHORIZED EXIT POINTS
Airports
- Ahmedabad
- Amritsar
- Bagdogra
- Bengaluru
- Bhubaneshwar
- Calicut
- Chandigarh
- Chennai
- Cochin
- Coimbatore
- Delhi
- Gaya
- Goa
- Guwahati
- Hyderabad
- Jaipur
- Kannur
- Kolkata
- Lucknow
- Madurai
- Mangalore
- Mumbai
- Nagpur
- Patna
- Port Blair
- Pune
- Srinagar
- Surat
- Tiruchirapalli
- Tirupati
- Trivandrum
- Varanasi
- Vijaiwada
- Vishakhapatnam
Land Customs Points
- Attari Road
- Akhaura
- Banbasa
- Changrabandha
- Dalu
- Dawki
- Dhalaighat
- Gauriphanta
- Ghojadanga
- Haridaspur
- Hili
- Jaigaon
- Jogbani
- Kailashahar
- Karimgang
- Khowal
- Lalgolaghat
- Mahadipur
- Mankachar
- Moreh
- Muhurighat
- Radhikapur
- Ragna
- Ranigunj
- Raxaul
- Rupaidiha
- Sabroom
- Sonouli
- Srimantapur
- Sutarkandi
- Phulbari
- Kawarpuchia
- Zorinpuri
- Zokhawthar
Ports
- Alang
- Bedi Bunder
- Bhavnagar
- Calicut
- Chennai
- Cochin
- Cuddalore
- Kakinada
- Kandla
- Kolkata
- Mandvi
- Mormagoa Harbour
- Mumbai Seaport
- Nagapattinum
- Nhava Sheva
- Paradeep
- Porbandar
- Port Blair
- Tuticorin
- Vishakapatnam
- New Mangalore
- Vizhinjam
- Agati and Minicoy Island Lakshdwip UT
- Vallarpadam
- Mundra
- Krishnapatnam
- Dhubri
- Pandu
- Nagaon
- Karimganj
- Kattupalli
Railway Customs Points
- Munabao Rail Check Post
- Attari Rail Check Post
- Gede Rail and Road Check Post
- Haridaspur Rail Check Post
- Chitpur Rail Check Post
Both the entry and exit points can be consulted in an updated way on the website of the Indian Government:


1.8. How far in advance can the tourist e-visa be requested?
- 30-day tourist eVisa. In this case, you must apply for the electronic visa at least 4 days before the date you plan to enter and no later than 30 days before. For example, if you request eVisa on September 1, then you can select as your arrival date between September 5 and September 30.
- Tourist eVisa of 1 or 5 years. In this case, you can apply for the electronic visa at least 4 days before entering India and at most 120 days before. For example, if you request eVisa on September 1st, then you can select as your arrival date from September 5th to January 2nd (that is, 120 days).
1.9. How long does it take to issue the e-visa?
The electronic visa is issued within a maximum period of 72 hours. In the real example that I detail below, I applied for the electronic visa on a Saturday afternoon at 6:30 p.m., and on Monday at 3:05 p.m. I had already received the visa, that is, it took less than 48 hours. A quick mission period considering that there was a Sunday involved.
If any information or documentation (photo, passport…) is incorrect, they will notify you by email, so that you can enter the application platform again and correct it.
1.10. Where the e-visa is requested?
You can request the e-Visa India in two ways:
- On your own, through the official website of the Government of India: https://indianvisaonline.gov.in/evisa/tvoa.html. This is the most economical way and I explain step by step below.
- Another option is to order the procedure from a visa agency, which charges additional management costs. This is a good option, if you have problems with the official website, either when filling out the form, uploading the documentation or making the payment. It can also be a good option, if you need personalized advice for your specific case. An example of these agencies is iVisa.

Finally, a very important recommendation: don’t be fooled by the multitude of fake or fraudulent websites that pretend to be the official website and that appear in Google results. Examples:
- e-touristvisaindia.com
- e-visaindia.com
- evisaindia.com
- indianevisaservice.org
- indiaevisa.org
If you find any other fraudulent website, tell me and I will add it to the list.
2. STEPS TO OBTAIN THE ELECTRONIC VISA TO INDIA (eVisa or ETA)
STEP 1. Have a valid passport and scan the first page
Before beginning the e-Visa application process, it is necessary to have a passport, which must be valid for at least 6 months from the expected date of entry into India. That is, if the proposed travel date is July 1, 2020, then your passport must have an expiration date beyond December 31, 2020.
In the e-visa application, you will be asked for a scanned copy of the passport page where your personal data and your photo are located, so you must have it prepared before filling out the application form. It must meet the following characteristics:
- Pdf format
- Minimum size of 10 KB and maximum 300 KB. I had the problem that the scanned passport occupied a size of 3 Mb, so I had to compress it. There are many ways to do it. I opted to compress it using the free service offered by https://smallpdf.com/compress-pdf for compressing PDF files.
You must also note that the passport must not present any damage, scratch or ripping. If this is the case, it’s better to renew it before applying for the electronic visa.

STEP 2. Take a digital photo
During the eVisa application process, you will have to upload to the platform a recent photograph with a white background, which meets the following requirements:
- JPEG format.
- Size: minimum 10 KB and maximum 1 MB.
- The height and width of the photo must be the same.
- The photo must be full face, front view, eyes open and without glasses.
- Center the head inside the frame and present the entire head from the top of the hair to the bottom of the chin.
- The background must be light or white.
- No shadows on the face or background.
- Without borders.
- No smile :)
The photo that I have uploaded in the real example of this article was taken with my phone, on a wall with a light background.
If you need to compress the photo you can use this free online tool: https://picresize.com/

STEP 3. Fill in the electronic form
Once you have your passport scanned and your digital photo, it is time to fill out the application form. But before filling it out, consider the following:
- I used Chrome browser to apply for a visa and I had no problems, but if you have problems, you can try a different browser (Firefox, Safari, Internet Explorer, etc.).
- Disable pop-up blockers that you have activated in your browser.
- If you have problems with any of the payment systems, try the other alternatives offered. I have paid with PayPal without problems.
- i / L / 1: if you have trouble entering your ID to retrieve the form or to check the status of your application, verify that you are using the appropriate “I”: it could be an uppercase “i”, a lowercase “L” or even a “1”. This is a fairly frequent problem.
- Throughout the form you will find questions that you may not understand. Don’t worry, below I explain the meaning of all the questions.
3.1. Select your nationality and type of visa
Firstly, to fill out the electronic visa form you must enter the official website of the Ministry of Interior of the Indian Government and click on the button «Apply here for e-visa».

In the first part of the form you must enter the following information:
- Passport type. The vast majority of people travel with an ordinary passport.
- Nationality/Region. Select your nationality.
- Port of Arrival. Select the airport or port of entry in India. In this case I choose the Delhi airport.
- Birthdate. Your birth date.
- Email ID. Write your email address.
- Re-enter Email ID. Enter your email again to avoid mistakes.
- Expected Date of Arrival. Here you must indicate the expected date of entry into India (taking into account the schedule of India).
- In the real example, I’m requesting a 30-day tourism eVisa. I’m doing it on September 28 and the system lets me choose as the date of entry tickets between October 2 (4 days after the date of the request) and October 27 (30 days after the date of the request).
- If I request the eVisa for 1 year or 5 years, the system allows me to choose an arrival date between October 2 (4 days after the request date) and January 26, 2020 (120 days after the application date).
- In any case, I choose on October 25, since it is the date that the applicant plans to arrive at the Delhi airport.
- Visa service. Here you must choose the type of visa. In this case, I choose “eTourist visa (for 30 days) – Recreation/Sight-Seeing”, since it is a 10-day tourism trip. If your trip is for a period of more than 30 days then you must select a 1 year or 5-year visa.

The system warns you that you must have the first page of the scanned passport prepared (the page where your photo and personal data appears) in PDF format and a recent digital photo. If you have followed steps 1 and 2 of this article, you should already have both the scanned passport and the digital photo ready.
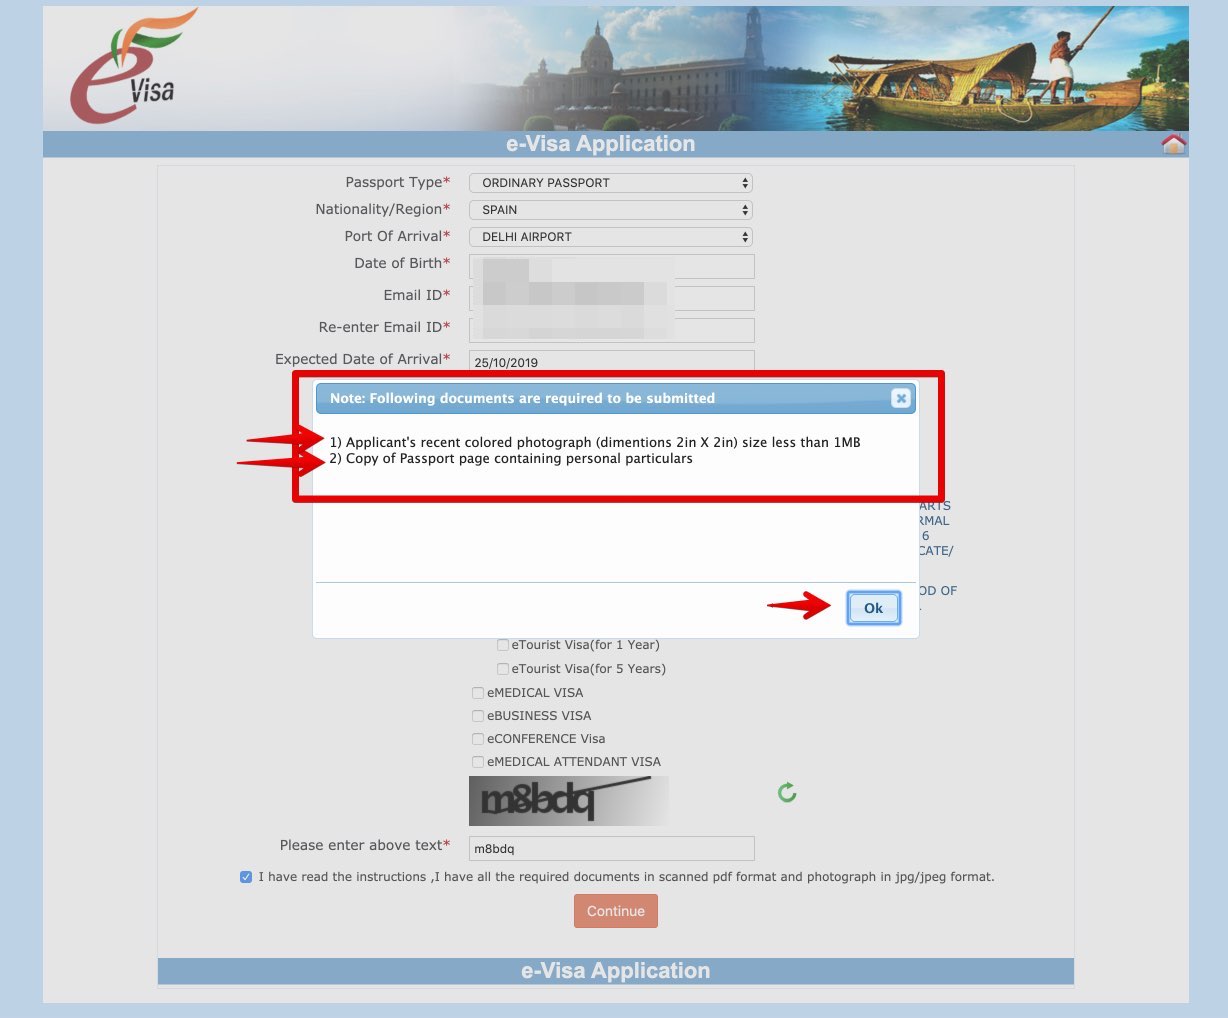
Once the first screen of the form is completed, you will receive an automatic email with the temporary ID number of your application, in case you want to continue filling the form another day (it is valid for 7 days). This ID is also visible in red above the form on each page.
3.2. Enter your personal information: name, address, family, spouse, etc.
In the second part of the form, you must enter your personal information and your passport information.
Personal applicant data
- Surname (exactly as in your Passport).
- Given Name/s (exactly as in your Passport).
- Have you ever changed your name? If yes, click the box and give details.
- Gender.
- Date of Birth.
- Country/Region of birth.
- Citizenship/National Id No. Card ID number of your country, if there is a national identification system. Otherwise, you can indicate NA (not applicable). American, British or Australian citizens can indicate NA (you don’t have to indicate the social security number).
- Religion.
- The drop-down list allows you to choose between different religions. You don’t need to worry about what is answered in this question because nobody is going to check:
- Bahai
- Buddhism
- Christian
- Hindu
- Muslim
- Parsi
- Sikh
- Zoroastrian
- If your religion doesn’t appear in the dropdown list, you must indicate it in this section. If you are an atheist or agnostic you can also indicate it in this section.
- Visible identification marks. It refers to whether you have birthmarks or visible tattoos. If this is not the case, you can indicate NA (not applicable).
- Educational Qualification. Select your education level:
- BELOW MATRICULATION
- GRADUATE (college studies)
- HIGHER SECONDARY (secondary education)
- ILLITERATE (no studies)
- MATRICULATION
- POST GRADUATE (master, doctor, etc)
- PROFESSIONAL (professional training)
- Did you acquire Nationality by birth or by naturalization.
- Have you lived for at least two years in the country where you are applying visa?
- Passport Number.
- Place of Issue.
- Date of Issue.
- Date of Expiry.
- Any other Passport/Identify Certificate(IC) held. If you have any other valid passport or identification certificate from another country.

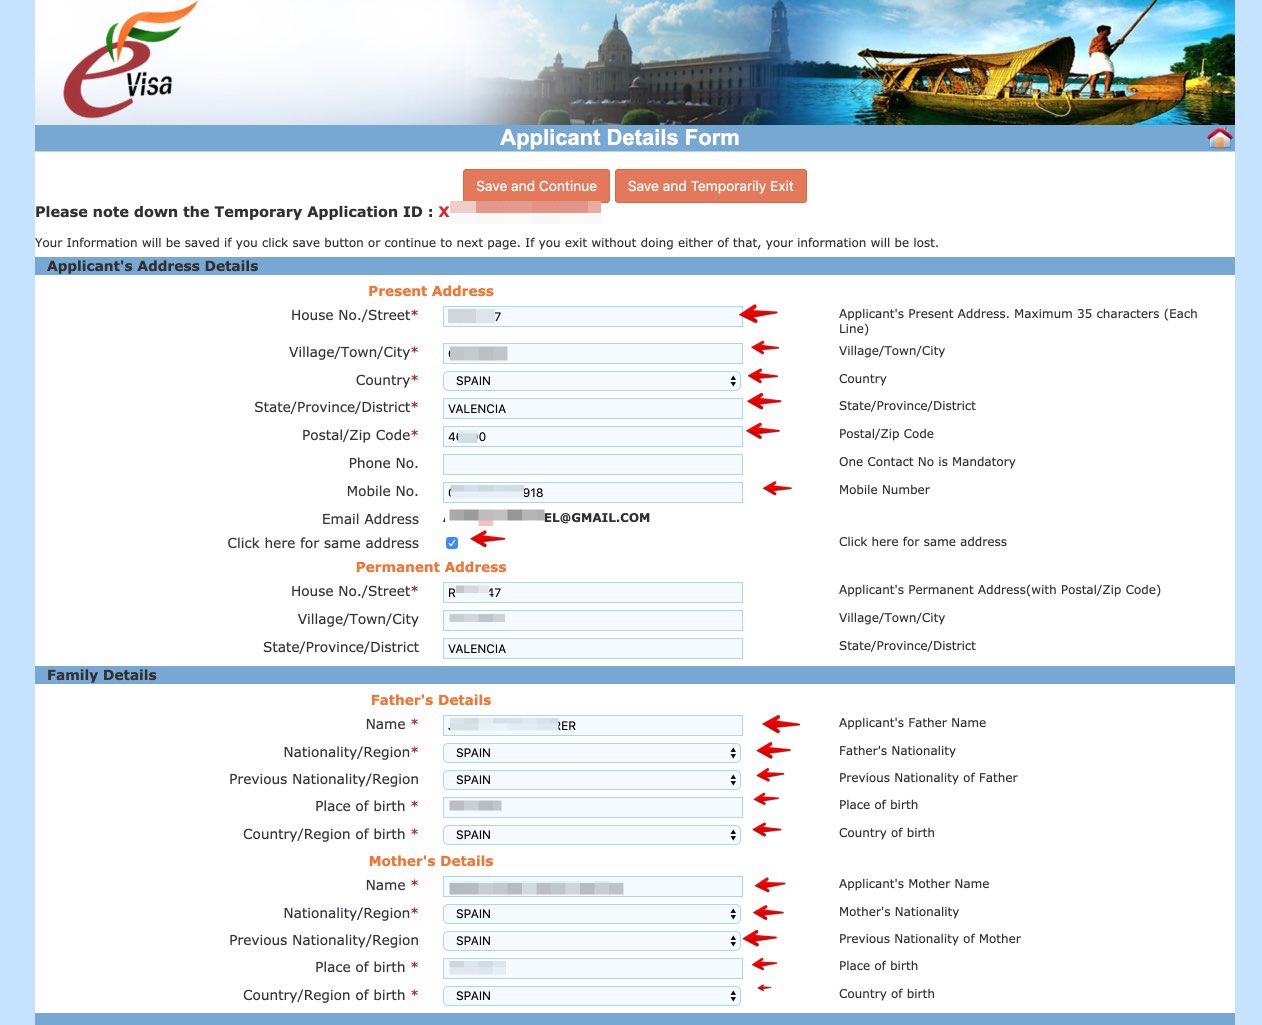
3.3. Address and data of your parents
Present Address
- House No./Street
- Village/Town/City.
- Country
- State/Province/District.
- Postal/Zip Code
- Phone No.
- Mobile No.
- Email Address.
Permanent address
- Click here for same address. If the previous address is your permanent address, check this box. If your permanent address is different then you must indicate it.
Father’s details
- Name
- Nationality/Region
- Previous Nationality/Regions
- Place of birth
- Country/Region of birth.
Mother’s details
- Name
- Nationality/Region
- Previous Nationality/Regions
- Place of birth
- Country/Region of birth
3.4. Information about your spouse and your profession
Applicant’s Marital Status. You must indicate your situation: married, single, divorced, widowed, etc.
Spouse’s Details
- Name
- Nationality/Region
- Previous Nationality/Regions
- Place of birth
- Country/Region of birth
Were your Parents/Grandparents (paternal/maternal) Pakistan Nationals or Belong to Pakistan held area. If this is the case, you must indicate if your parents or grandparents were Pakistani.
Profession / Occupation Details of Applicant
- Present Occupation. You must indicate your profession, or if you are unemployed.
- Employer Name/Business. Name of the company you work for or name of your business.
- Designation. You can put the position you occupy in the company (not mandatory).
- Address. Work address.
- Phone. The phone number is not mandatory.
- Past Occupation, if any. Indicate here, where appropriate, your previous occupation.
- Are/were you in a Military/Semi-Military/Police/Security organization? Indicate if you are or have been in a military, police or security organization.

3.5. Details of your visa, previous trips and contact persons
On the next screen you must complete your visa information:
Details of Visa Sought
- Type of visa. E-Visa (it is already filled in).
- Visa Service. In the example “e-Tourist Visa (for 30 days)” (it is already filled in, based on what you chose on the first screen of the form).
- Place to be visited. Indicate here the cities you plan to visit, that is, your itinerary. For example, Delhi, Jaipur, Mumbai and Agra.
- Have you booked any room in Hotel/Resort etc, through any Tour Operator? If you are not traveling with any complete tour package of any tour operator, then you must mark “No”. In the example, the tourist has hired the hotels on his own and does not travel with any tour operator, so in this box “No”.
- Duration of Visa. It is already filled in based on what you previously selected.
- Number of Entries. Double, since it is a 30-day tourist visa (it is already filled in). If it were a 365-day or 1-year visa, the system would indicate “Multiple”.
- Port of Arrival in India. It is already filled in based on what you selected on the first screen of the form. In this example, it is the Delhi airport.
- Expected Departure Port from India. Here you must indicate the place where you plan to leave India. As my plane ticket is with arrival and departure from Delhi airport, I indicate it on the form.

Previous Visa/Currently valid Visa Details
- Have you ever visited India before?You must indicate if you have visited India before.
- Has permission to visit or to extend stay in India previously been refused? If you have been previously denied a visa application to India or a visa extension, then you must mark it here.
Other information
- Countries Visited in Last 10 years. You must indicate the countries you have visited during the last 10 years. It is very important to indicate correctly the countries that you have visited, and that appear in your passport either through stamps or visas, since the authorities can check it.
SAARC Country Visit Details
- Have you visited SAARC countries (except your own country) during last 3 years? Here you are asked if you have visited any country of the SAARC (South Asian Association for Regional Cooperation). These countries, which come in the drop-down, are Afghanistan, Bhutan, Pakistan, Maldives, Bangladesh, Sri Lanka and Nepal. If the answer is yes, you must complete the information; otherwise, mark “no”.
Reference
- Reference Name in India. In this section you must indicate the name of a reference person in India who is not travelling with you (friend or relative living in India) in case of an emergency. If you are travelling on your own and not with a travel agency, the most common is not to have a reference person in India, so in this case you must indicate the name of the hotel where you will be staying. Simply enter Booking to copy and paste your hotel data. If you still don’t have a hotel you can put one at random.
- Address.
- Phone.
- Reference Name in (your country).
- Here you must indicate the name of a reference person in your country (who is not travelling with you), whether a friend, spouse or family member, in case there is an emergency during your trip.
- Address.
- Phone.
On this map, you can choose a Delhi hotel to include in your form:

3.6. Additional questions about your rebel past
In this section, you will have to answer a series of questions in which the answer will normally be “No”:
- Have you ever been arrested/ prosecuted/ convicted by Court of Law in any country?
- Have you ever been refused entry / deported by any country including India?
- Have you ever been engaged in Human trafficking/ Drug trafficking/ Child abuse/ Crime against women/ Economic offence / Financial fraud?
- Have you ever been engaged in Cyber crime/ Terrorist activities/ Sabotage/ Espionage/ Genocide/ Political killing/ other act of violence?
- Have you ever by any means or medium, expressed views that justify or glorify terrorist violence or that may encourage others to do terrorist acts or other serious criminal acts?
- Have you sought asylum (political or otherwise) in any country?
Finally, you will have to check the corresponding box to declare that all the information provided is correct.

3.7. Upload a digital photo
Then you must upload a digital photo, which meets the conditions detailed in step 2:

You must move the photo, so that it fits well in the frame:


3.8. Upload the scanned passport (personal information page)
In this section, you should upload a scanned copy of the passport page where your personal information and your photo is placed, as I explained in step 1:


3.9. Summary
Once you have uploaded the scanned passport, you can see a summary of your application, with all the data entered so that you can verify that everything is correct.
If any data is incorrect, click on “Modify” to modify it. If everything is correct click on “Verified and Continue”.


3.10. Make the payment
Next, you will have to pay the electronic visa issuance fees. You can choose to pay now (“Pay Now”) or pay later (“Pay Later”).

Payment by bank card or PayPal
You can pay by debit or credit card or through PayPal.
Payment by card implies an additional bank charge of 2.5% on the visa fee. To do this, you can select one of these two options:
- Sbi e-pay. The payment system of the State Bank of India, the largest bank in India, and one of the 50 largest banks in the world. It allows to pay by Visa and MasterCard.
- Axis Bank. Axis Bank payment system, which allows you to pay using Visa, MasterCard and Maestro cards.
Payment through PayPal has an additional charge of 3.5% and is made through the Sbi e-pay system.
In the example below, you can see the process. I have made the payment through PayPal and I didn’t have any problems.


Verifying payment status
After making the payment, you have to wait at most 2 hours until it appears as confirmed, which you can check by accessing the main website and clicking on “Verify Payment/Pay e-Visa Fee”.
In the example below, it took about 15 minutes for the payment to appear as successful (Status: Success)


3.11. Download and print the application form (optional)
If you wish, you can download and also print the completed application form in PDF format. To do this, you must access the main website and click on “Print e-Visa Application”.


STEP 4. Receive your visa in PDF format (in a maximum 72 hours)
Once you have filled out the form and paid the fees, you have to wait.
You can check the status of your visa by clicking on the “Check your Visa Status” button.
If you do it as soon as you make the payment, you will see that a message appears warning you that your visa application can take up to 72 hours and that you will be notified by email, when the Indian authorities have made a decision.


In the real example of this article, I applied for a visa on a Saturday at 6:30 p.m. and the following Monday at 3:06 p.m. I received an email notifying me that the visa had been granted (Application Status: Granted).

To download the visa, you must enter “Check your Visa Status”, enter the details of your application (Application ID) and your passport number:


It is very important to verify that all electronic visa data are correct: nationality, name, passport number, birthdate, etc. If there is any incorrect information, you must notify the Indian Visa Assistance Center via email, by writing at indian-evisa@gov.in.
STEP 5. Purchase travel insurance (optional, but highly recommended)
An optional but very important last step is to take out medical travel insurance. In a country like India, it is essential to carry travel medical insurance, in case any eventuality arises. Otherwise, healthcare can be very expensive.
Keep in mind that the cost of travel insurance is very low, in relation to the risks it covers. Most likely, you won’t use it, but you have to be prevented.
If you don’t have travel insurance, I recommend you take out insurance with World Nomads.

3. PASSPORT AND VISA CONTROL IN INDIA
Upon arrival in India, you must follow the directions to get to the “eVisa” counter. At this counter you must show the following documentation:
- Passport. You must present the passport with which you made the electronic visa application. However, entry with a new passport is also allowed (even if the electronic visa was issued with the previous passport), but in that case you must carry the old passport with which the electronic visa was issued.
- ETA or printed electronic visa.

You will deliver this documentation to the immigration officer and this will proceed as follows:
- Check that your ETA data matches your passport, and what you stated in the application.
- They will take your biometric data, that is, a new digital photograph and your fingerprints. If you refuse to take this biometric data, you will be denied entry to India.
- They will stamp in your passport the date of your arrival in India and the date on which your visa expires.
- In the case of the 30-day tourist visa, the arrival date marks the beginning of the 30-day period. Of course, you must enter India within the period marked in your ETA.
- In the case of an ETA of 365 days (or 5 years), the period begins from the date of issuance of the visa and not from the date of entry into India.
4. FINAL RECOMMENDATIONS TO MOVE IN INDIA
To end this article, I will give you some final recommendations on currency exchange, SIM phone cards and transportation in India.
4.1. Currency exchange (Indian rupees)
Avoid changing Indian rupees at the airport, since the exchange rate is the worst. It’s much better to do it in exchange houses of the city center. The best and most economical is to pay by card, since both Visa and MasterCard offer a good exchange rate.
You can also get the Revolut card that offers the best exchange rate when paying by card, and that you can request for free on this link.

4.2. SIM phone card in India
SIM card prices at airports tend to be more expensive, as they are likely to try to sell you the Traveler SIM or the Tourist SIM card, with more expensive rates to surf the Internet. It is better to buy the SIM card once you arrive in the city. You will need your passport, a photo and the address of your hotel in India.
To compare plans, it is best to look at the websites of Indian phone companies: Vodafone India, Bharti Airtel, Idea Cellular and Reliance JIO..
You also have the possibility to buy the SIM card before going on the trip, with SimCorner. While it will be more expensive, you save having to do the paperwork in India.

4.3. Transportation to the city centre
The fastest and most economical way to get to the center of Delhi from the airport is with the orange metro line (called “AirPort Express”). You can also take a taxi at the airport (beware of the abusive rates that some taxi drivers can charge you!) Or, better yet, book it in advance with Kiwitaxi, so that the taxi driver is waiting for you at the airport.

4.4. Guided tours in India
Lastly, to make guided tours in India, I recommend checking out the wide range of guided tours in India offered by the GetYourGuide platform.

I hope this article has helped you get your eVisa or ETA to India and prepare your trip. If so, you can help me by sharing this article on your social networks! Thank you very much!
In This Article
Was this useful? I'll tell you when something changes in Russia
One short email a month with what has changed for travellers (visas, payments, border crossings, apps), based on what readers report to me from Russia. More than 4,000 of us already. No spam: if you ever lose interest, unsubscribing is one click.
Irena DomingoAbout Me
I was born in Russia. I grew up between two worlds: my father was Russian, my mother Spanish — a descendant of the "Children of Russia", the Basque children evacuated to the USSR during the Spanish Civil War. I've worked as a translator, interpreter and Russian teacher for over 30 years, and since 2013 I've been writing this blog to help travellers discover Russia with practical, always up-to-date information. Author of the Russiable Guide. If this blog has helped you plan your trip, you can buy me a coffee ❤️.
 How to apply for the electronic visa to Uzbekistan (e-Visa)
 Do You Need a Visa for Mongolia? The 30-Day Exemption, Explained
 Travel to Belarus Without a Visa in 2026: Requirements and How to Enter